
Shane Chaffe
2 min read ⏳
Creating a project with the Spotify Rest API
When creating this project, on the surface it seemed straightforward forward but isn't that the case with most things? Throughout the project I hit multiple blockers especially when it came to authentication, this was single-handedly the toughest part of the application since Spotify has quite tight requirements on using the API.
Spotify Authentication
As you can see in this diagram taken from here, there is a very specific way to authenticate the current user in order to generate a token to authenticate the Spotify API.
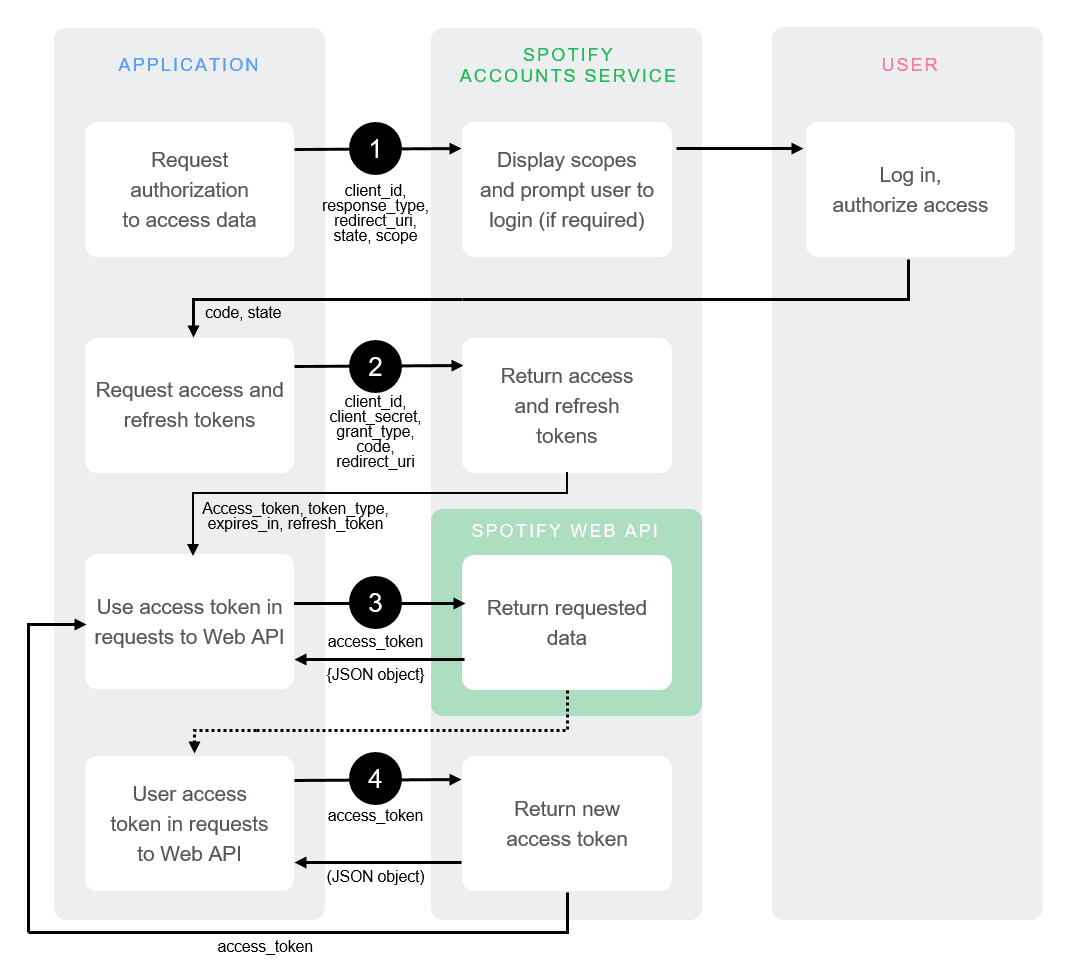
When reading the flow left to right it makes complete sense, the steps are:
Initialise authentication requests from user in the web app
Tell Spotify which scopes you require from their web api
Complete authentication
Upon successful auth, request/refresh access tokens and return them
Once you have the access token you can authenticate your requests to the Spotify Web API
Fetch your data
Using Next Auth to go through the flow and authenticate your requests to Spotify
Next Auth is a great package that works particularly well with the Pages router of Next.js, the setup is rather seamless and you only need a few methods to be imported to be on the way. The primary part of setting up Next Auth is ensuring you are getting an access token for Spotify and that you are correctly setting up scopes so that your requests have access to certain areas of the API.
What are scopes?
const scopes = [
  "user-read-email",
  "playlist-read-private",
  "playlist-read-collaborative",
  "user-read-email",
  "streaming",
  "user-read-private",
  "user-library-read",
  "user-top-read",
  "app-remote-control",
  "streaming",
  "user-read-playback-position",
  "user-top-read",
  "user-read-recently-played",
  "user-read-playback-state",
  "user-modify-playback-state",
  "user-read-currently-playing",
  "user-follow-read"
].join(",");

const LOGIN_URL = `https://accounts.spotify.com/authorize?${params.scope}`.toString();
Here we have an array of strings, each string is a permission that Spotify is going to ask you for in order to use their API, these give you access to certain areas of the API.
You'll then end up with a really long URL which looks like this:
https://accounts.spotify.com/authorize?user-read-email,playlist-read-private,playlist-read-collaborative,user-read-email,streaming,user-read-private,user-library-read,user-top-read,app-remote-control,streaming,user-read-playback-position,user-top-read,user-read-recently-played,user-read-playback-state,user-modify-playback-state,user-read-currently-playing,user-follow-readUsing the .join(",") method will bring all the strings together and separate them by a comma so the Spotify API is able to read this from the URL and determine which areas you have access to. This is a very important part of being able to authenticate your requests.
Next, you have to ensure that your authOptions are configured to use the SpotifyProvider which is the login method, you'll notice I attach the scopes in the authorization section here. Then we generate our JSON Web Token using the Next Auth package built-in method of jwt.
export const authOptions = {
  // Configure one or more authentication providers
  providers: [
    SpotifyProvider({
      clientId: process.env.SPOTIFY_CLIENT_ID ?? "",
      clientSecret: process.env.SPOTIFY_CLIENT_SECRET ?? "",
      authorization: { params: { scope: params.scope.toString() }},
    }),
    // ...add more providers here
  ],
  secret: process.env.JWT_SECRET,
  pages: {
    signIn: "/login",
  },
  callbacks: {
    async jwt({ token, account }) {
      if (account) {
        token.accessToken = account.access_token;
        token.refreshToken = account.refresh_token;
        token.accessTokenExpires = account.expires_at;

        return token;
      }

      if (Date.now() < token.accessTokenExpires * 1000) {
        return token;
      }

      return refreshAccessToken(token);
    },
    async session({ session, token, user }) {
      // Send properties to the client, like an access_token from a provider.
      session.accessToken = token.accessToken;
      return session;
    },
  },
};

export default NextAuth(authOptions);
This ultimately ends up being a request to the Spotify service to generate the authentication token:
async function refreshAccessToken(token) {
  const response = await fetch("https://accounts.spotify.com/api/token", {
    method: "POST",
    headers: {
      "content-type": "application/x-www-form-urlencoded",
      Authorization:
        "Basic " +
        new Buffer.from(
          process.env.SPOTIFY_CLIENT_ID +
            ":" +
            process.env.SPOTIFY_CLIENT_SECRET
        ).toString("base64"),
    },
    body: new URLSearchParams({
      grant_type: "refresh_token",
      refresh_token: token.refreshToken,
      client_id: process.env.SPOTIFY_CLIENT_ID
    }),
  });

  const data = await response.json();

  console.log("DATA FOR TOKEN = ", data)

  return {
    accessToken: data.access_token,
    refreshToken: data.refresh_token ?? token.refreshToken,
    accessTokenExpires: Date.now() + data.expires_in * 1000,
  };
}
So once this request is made, you are given your access token:

This can be used again and again by accessing the current session which is exposed from Next Auth. In my case, I refactored my fetch requests into a custom hook named "useHttp" so I could end up saving over 300 lines of code.
import { useSession } from "next-auth/react";
import { useRouter } from "next/router";
import { useEffect, useState } from "react";

export function useHttp(url: string, token: string) {
  const [data, setData] = useState(null);
  const [error, setError] = useState(null);
  const [loading, setLoading] = useState(false);
  const router = useRouter();
  const { data: session } = useSession();

  useEffect(() => {
    if (session === undefined) {
      router.push("/login");
    }
    async function getData() {
      try {
        setLoading(true);
        const response = await fetch(url, {
          headers: {
            Authorization: `Bearer ${token}`,
          },
        });

        if (!response.ok) {
          console.error("Something went wrong...", response)
        }

        const userData = await response.json();
        setData(userData);
      } catch (error) {
        setError(error);
      } finally {
        setLoading(false);
      }
    }

    getData();
  }, [url, session]);

  return { data, error, loading };
}
It accepts the token to authenticate the request and the URL of which endpoint you wish to make a request to, simple but incredibly effective and makes your code a whole lot more readable.
Technology used: